Discovering the Lomo Daylight Developing Tank: Hannah Brown's First Impressions
19Longstanding Lomography UK team member Hannah Brown decided to roll her sleeves up, don a flowery apron and make a space in her kitchen to test out the new Lomo Daylight Developing Tank. She used two rolls of Lomography Lady Grey 400 B&W 35 mm film and then spent an afternoon processing the films herself. We talked to Hannah about her experiences using the new tank, testing it out at home and the sheer joy of seeing your images come alive, perfectly formed, on a tiny strip of plastic.
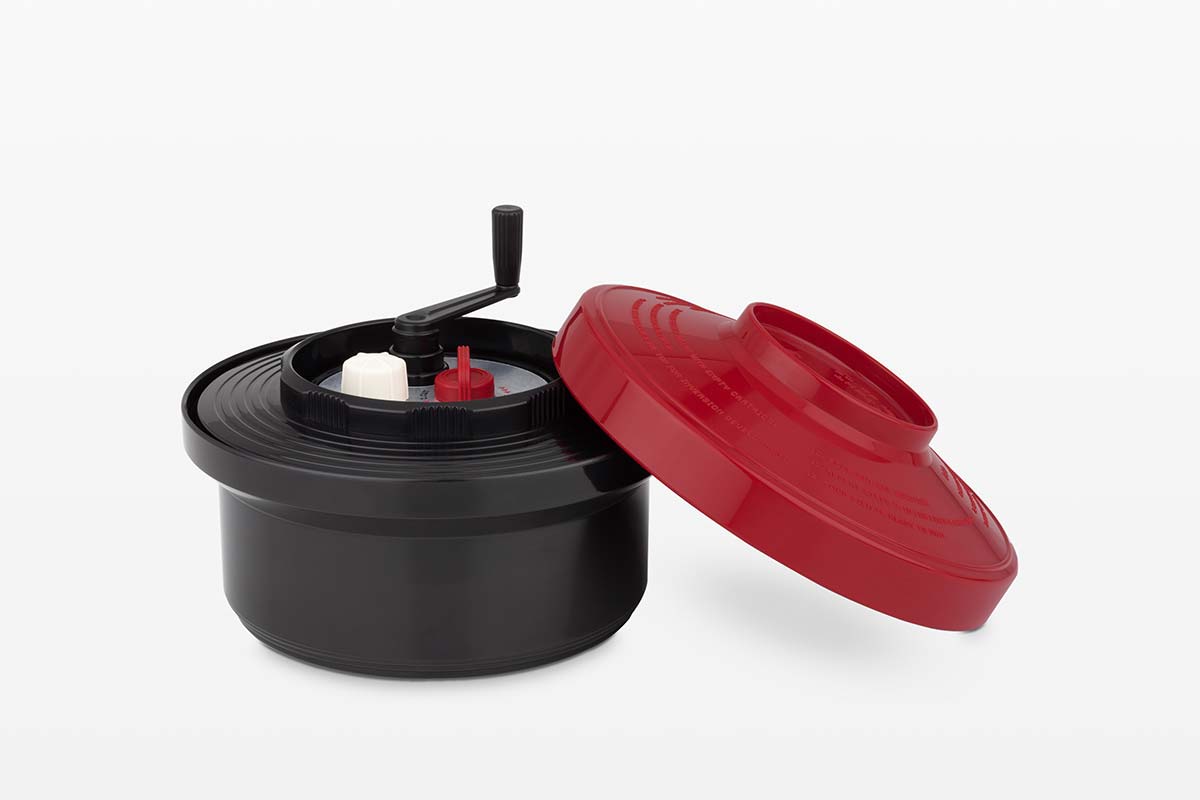
Photography equipment used:
Film camera: Lomo LC-Wide and Olympus Trip
Film: Lady Grey ISO 400 35 mm B&W film
Developer: Illford Starter Kit
Fixer: Illford Starter Kit
Development method: Agitation


Hi Hannah! How was your overall experience of using the Lomo Daylight Developing Tank?
Using the development tank to process films at home was an absolute joy. I used a roll of Lomography Lady Grey 400 B&W 35 mm film which I shot on my Lomo LC-Wide and Olympus Trip cameras with the Illford Processing Starter Kit and I agitated the film. Both rolls came out really well. It will never cease to amaze me that a strip of blank plastic can be popped in a tank and come out with tiny, perfectly formed images. Film processing is a kind of super-magic which makes film photography such a visceral experience and developing your own film from home just brings that magic into sharp focus.


What did you like most about it?
My previous experience of spooling and cutting the negative from the canister was always rather fiddly and cumbersome. It would usually involve using a dark bag or darkroom where you had to feel your way around and try to cut the negative without accidentally cutting your finger off. The design of the new tank means you can now perform the whole development process in this light-tight container and the cutting mechanism which releases the canister from the film was, quite frankly, ingenious.


Do you have any tips for others using this developing tank?
You'll need to do a little bit of prep if it's your first time developing at home. Make sure you have three measuring jugs ready and a thermometer to test the temperature of the water. It's best to have your chemicals pre-mixed and ready to go before the processing starts.
Fill a big bowl or bucket with water at the correct temperature and then use a ladel to add the water to each measuring jug with the processing chemicals. I also recommend buying some small bulldog clips which you can use to hang your processed negative to dry.


For you, what is the appeal of self-developing film at home?
Analogue photography is a process; a series of steps you take to get your desired outcome. In understanding and testing those processes you are then able to challenge, adjust or break apart those boundaries to create something unique. It’s the endless possibility of trial and error that makes film photography exciting and ever-evolving. In learning how to process film at home I can now choose how to manage and manipulate my photos. Maybe i’ll try processing the most perfect roll of film or maybe i’ll try using coffee to develop a roll, who knows? The Lomo Daylight Developing Tank gives me the option to play, experiment and try new processes out, which is the reason I fell in love with film photography in the first place.
If you're ready to dive into developing your own film, check out our new Lomo Daylight Developing Tank! Grab your roll of film, follow the steps, and enjoy the satisfaction of developing your own photos!
2025-02-27
#gear #lomo-daylight-developing-tank


No Comments