Cameraless Photography: How to Create Chemigrams
5 26 Share TweetDrained from your usual analogue routine? Perhaps it’s time to test your skills on early photography techniques with chemigrams. Chemigrams is a way of capturing positive or negative images straight onto light-sensitive paper by using various objects. As a photography teacher, making my students learn about chemigrams helps them understand the difference between positive and negative images. It’s also the basic introduction to photographic chemicals as well. Learning old printing techniques also open more creative possibilities.


Materials to Use
You only need a few things to make chemigrams:
- Light sensitive paper
- Three trays
- Developer, Stop and Fixer chemicals.
- No darkroom needed
- Paper towels or kitchen towels would be handy.
Setting Up
As you’re not making an actual replica of a picture it doesn’t matter if your paper gets exposed to light, just be..sure not to expose the whole box. You will need three trays, one for each chemical. Set them up as recommended by the brand for paper development, not film. For ease of reference, label each tray. Okay, you’re ready to go!
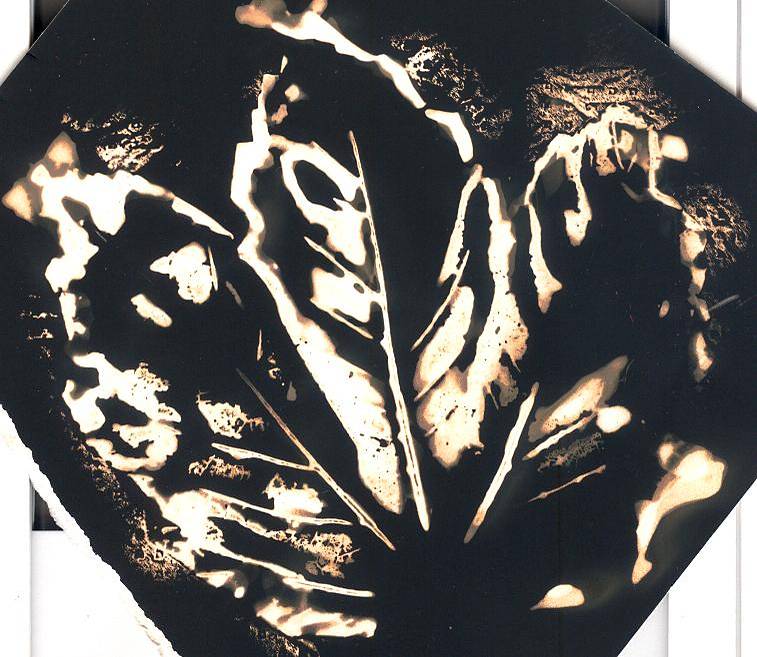
How to Create Positive Prints
Select an object. Usually, more absorbent objects work best such as flowers, leaves, and plants. You can also create handprints if you’re sure to wash your hand extremely well straight after. Dip your object into the developer. This is just a dip, shake off any excess liquid. Carefully place onto your light sensitive paper cover with a paper towel. Evenly press down and hold for 40-60 seconds.
Remove, and magic! A black detailed print of your chosen object! Now to keep it there place the paper into the stop for 30 seconds then remove and place into the fixer for 5-10 minutes with regular agitation. Wash off in another clean water tray of a sink for 5 minutes to rid it of any chemicals. Complete!


How to Create Negative Prints
The process is the same as above only the order of the chemicals changes. This time you want to fix your chosen object so it remains white. Dip your object into the developer first and repeat as above. Place into the developer to give you the black background. This takes roughly 2 minutes or until you are happy with the darkness. Continue to stop and fix then wash as above! Complete!


Once you have mastered this and you’re ready to move onto the next level, Google chemigrams and check out the chemigram paintings. By using different dilutions it is possible to actually paint an image. This is a great way to get some fantastic prints for beginners and experts alike. Try it, upload your chemigrams to your LomoHomes and link them to me!
written by crevans27 on 2012-05-18 #gear #tutorials #art #flowers #white #black #plants #lab-rat #tipster #labrat #chemigrams


5 Comments