Tipster of the Week: Photos That Does Not Only Move, They Pop!
32 62 Share TweetWant to know how you can use the Pop9 to make some types of 3D images you’ve never seen before? Read on to know more about it!

Pop9 Pops Out! by gvelasco
Background
Most people assume that when you press the shutter release of the Pop9 you instantly create nine identical images of your subject, but this is not true. The placement of the lenses actually creates a tiny bit of parallax, that is a view from a slightly different angle for each lens — just like the difference between what your right eye sees and what your left eye sees. This means that you can use your Pop9 to do stereograms! Because the lenses are so close together, the parallax is not very pronounced, so you will want to choose your subjects carefully to enhance the illusion of depth. However, because we have nine (count ‘em nine) lenses with which to play we have some very interesting options that most stereographers don’t.
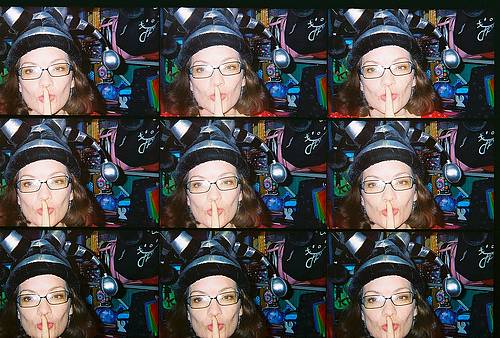
I will use the following picture as the source for the my examples.
Original Pop9 Image
Some Definitions
When I talk about the smaller images within the big image, I’ll refer to them using the following table:
| Image 1 | Image 2 | Image 3 |
| Image 4 | Image 5 | Image 6 |
| Image 7 | Image 8 | Image 9 |
When I talk about the “left image”, I’m referring to the image intended for the left eye, not necessarily the image that is on the
left on the screen.
Some basic concepts
For most of these methods we will be picking an image to show the right eye and one to show the left. Because of the arrangement of the lenses, we actually have many choices for which images to choose. In general we want to choose two images from the same row, images 4 and 6 for example as opposed to images 1 and 9. It is possible to use two images right next to each other, but the farther apart the images are, the more pronounced the parallax. Because of this images 4 and 6 are usually a better choice than images 4 and 5. Whereas most stereographers have only two images from which to choose, we have nine.
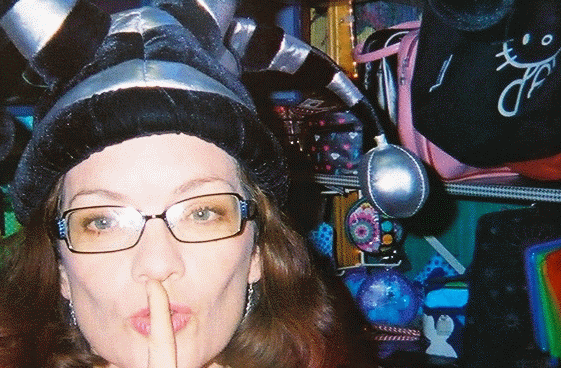
Because of the way the shutters work on the Pop9, the three rows might have slightly different exposures. You can pick your two pictures from the row that has the best exposure. Also, one row might have a slightly better composition than the others. You can pick your two pictures from the row with the best composition.It’s best to shoot using the slowest possible film that will still get you a good exposure because this will minimize the grain which will already be larger because you will be magnifying a smaller picture than normal. The images with which you will be working will be 1/9 the size of a standard 35mm image. If possible, it’s also best to scan the original image at a higher resolution than normal. I like to scan at three times the normal DPI so that I will have the same number of dots in each sub-image that I normally would in the full size image.Because of the arrangement of the lenses and the fact that images are actually inverted (upside down) on the film, the images on the right (3,6, and 9) of the picture will be the ones intended for your left eye, and the images on the left (1, 4, and 7) will be the ones intended for your right eye.
Don’t let this confuse you. I’ll talk you through it.
Cross Eyed Stereograms
Cross eyed stereograms require the viewer to cross their eyes so that each eye will see the correct image. That means that the image intended for the left eye is on the right of the screen and the image intended for the right eye is on the left of the screen. This is the easiest type of stereogram to do with the Pop9 because the images are already in the right position. If youlook at an unprocessed Pop9 picture and cross your eyes so that any two adjacent images – like 4 and 5 – are overlayed, you’ll see the picture in 3D!
The problem is that the parallax between two adjacent images like 4 and 5 is much less than the parallax between two images on opposite sides like 4 and 6. So it’s best to pick either 1 and 3, or 4 and 6, or 7 and 9, and put them together like this:

Wall Eyed Stereograms
Wall eyed stereograms are similar to cross eyed stereograms, but the images are reversed. The left-eye image is on the left and the right-eye image is on the right. Because of the way our eyes work, there is a more severe limit to the size of the images we can view using this technique.
Anaglyphs
Anaglyphs are stereograms where the left and right images are stacked on top of each other and the viewer to wears special glasses so that the left eye only sees the left image and the right eye only sees the right image. There are many ways to make anaglyphs. Each type of anaglyph has it’s own advantages and disadvanteges. There are “grey” anaglyphs and color anaglyphs. The most common anaglyphs are the red-cyan that require you to wear glasses with a red lens over the left eye and a cyan (blue) lens over the right eye. It’s possible to create an anaglyph from scratch using some digital photo editing software, but it’s a fairly complicated process. I highly recommend a program called StereoPhoto Maker for making anaglyphs and “wobble GIFs” which I’ll talk about later. When you make the anaglyph, you will want to use images 1 and 3, or 4 and 6, or 7 and 9. Remember that the images on the left (1, 4, and 7) are for the right eye and the images on the right (3, 6, and 9) are for the left eye.
Here is an anaglyph created with StereoPhoto Maker. If you have a pair of red-blue glasses you will be able to view this picture in 3D.
Wobble GIFs
Anaglyphs and “autostereograms” have been around a long time, but now the Web and animated GIFs in particular allow us to make another kind of “3D” image that doesn’t require the user to wear special glasses. Wobble GIFs alternate between the left and right image to give the viewer an impression of 3D. You can use a free program like StereoPhoto Maker or a GIF animation program like Ulead GIF Animator to create a GIF that alternates between the left and right images.
Here’s an example of a Wobble GIF using the same two images I’ve been using so far.
 |
Pop9 Mega Wobble
The Pop9 is the only camera of which I know that can be used to do this special version of the wobble. Instead of alternating between a left and right image, we can create an animated GIF using eight of the nine images. You can use a GIF animation program such as Ulead GIF Animator to animate the images in the following order:
1 → 2 → 3 → 6 → 9 → 8 → 7 → 4
As with the other techniques, there are other options. You can cycle through the images in the reverse order, or you can just “wobble” three images like 1 → 2 → 3 → 2. Here is what it looks like when you cycle through eight images in clockwise order:
 |
Here’s another example:
 |
And another:
 |
written by gvelasco on 2009-06-14 #gear #tutorials #tipster #tipster-of-the-week #pop-9 #animated-gif #lomography-pop-9 #lomography-3d-wobble-unique-animated


32 Comments